티스토리 글이 길어지면서 목차가 필요해졌습니다.
처음에는 플러그인을 사용하려고 했지만 Odyssey 스킨에서
그대로 적용되지 않는 부분이나 디자인이 마음에 안드는 부분이 있어
여러 블로그를 참고하여 직접 수정해가며 적용했습니다.
최종적으로는 아래와 같은 형태의 목차를 구현했습니다.
목차
지금부터 과정에 대해 설명드리겠습니다.
1. 게시글에 목차 HTML 블록 추가
티스토리 글쓰기 화면에서 목차를 표시할 위치에 커서를 둡니다.
상단 메뉴에서 다음과 같이 들어갑니다.
더보기(점 세 개)
→ HTML 블록

HTML 블록 안에 아래 코드를 넣습니다.
<div class="book-toc">
  <div class="toc-title">
    <span>목차</span>
    <button type="button" class="toc-toggle" aria-label="목차 접기 또는 펼치기">
      ☰
    </button>
  </div>

  <ul id="toc_list"></ul>
</div>
여기서 ul 태그 내부는 비워둡니다.
게시글이 실행될 때 자바스크립트가 글의 제목을 찾아 이 안에 목차 항목을 자동으로 추가할 것이기 때문입니다.
2. 스킨 HTML에 목차 생성 코드 추가
티스토리 관리자 화면에서 다음 경로로 이동합니다.
블로그 관리
→ 꾸미기
→ 스킨 편집
→ HTML 편집
→ HTML

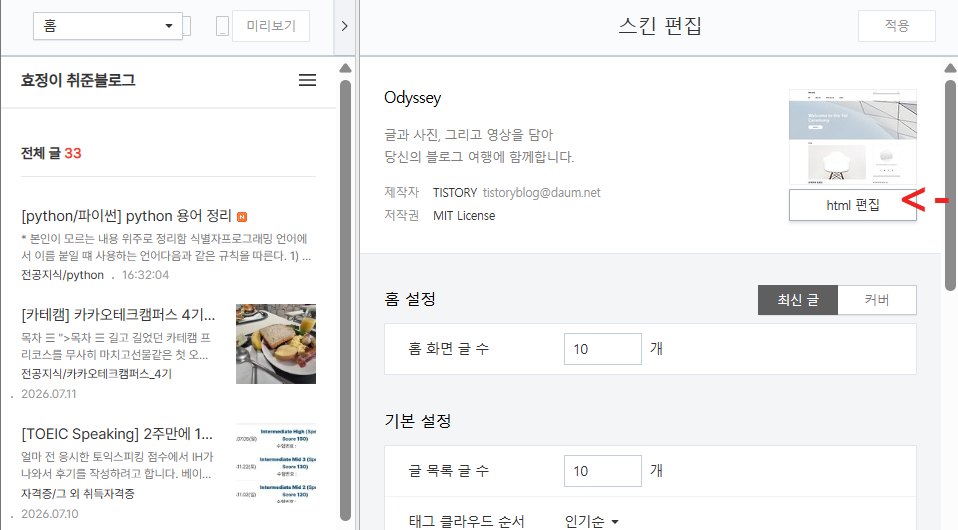
HTML 코드 아래쪽에서 </s_t3> 또는 </body>를 찾습니다. (Ctrl + F를 사용하면 편합니다.)
Odyssey 스킨에서는 다음과 같은 구조가 나옵니다.
    </div>
    <!-- // wrap -->

  </s_t3>

</body>
</html>
목차 생성 스크립트를 </s_t3> 바로 위에 넣습니다.
        </div>
        <!-- // wrap -->
        /*목차 생성 스크립트*/
        <script>
        document.addEventListener("DOMContentLoaded", function () {
          const tocList = document.querySelector("#toc_list");

          if (!tocList) return;

          const article =
            tocList.closest(".article-view") ||
            document.querySelector(".article-view");

          if (!article) return;

          const headings = article.querySelectorAll("h2, h3, h4");

          headings.forEach(function (heading, index) {
            if (heading.closest(".book-toc")) return;

            if (
              heading.closest(".article-page") ||
              heading.closest(".article-related")
            ) {
              return;
            }

            const id = "toc-heading-" + index;
            heading.id = id;

            const li = document.createElement("li");
            const link = document.createElement("a");

            link.href = "#" + id;
            link.textContent = heading.textContent.trim();

            link.addEventListener("click", function (event) {
              event.preventDefault();

              const position =
                heading.getBoundingClientRect().top +
                window.scrollY -
                80;

              window.scrollTo({
                top: position,
                behavior: "smooth"
              });
            });

            li.appendChild(link);
            tocList.appendChild(li);
          });

          const toggle = document.querySelector(".toc-toggle");

          if (toggle) {
            toggle.addEventListener("click", function () {
              tocList.style.display =
                tocList.style.display === "none"
                  ? "block"
                  : "none";
            });
          }
        });
        </script>
	</s_t3>
</body>
</html>
3. CSS 디자인 적용
스킨 편집의 CSS 탭으로 이동한 뒤 맨 아래에 목차 디자인을 추가했습니다.
/* 자동 목차 전체 영역 */
.book-toc {
  box-sizing: border-box;
  width: 100%;
  margin: 30px 0 40px;
  padding: 0 26px 20px;
  background-color: #f5f5f7;
  border-radius: 8px;
  color: #666;
}

/* 목차 상단 */
.book-toc .toc-title {
  display: flex;
  align-items: center;
  justify-content: space-between;
  min-height: 64px;
  margin: 0;
  padding: 0;
  border-bottom: 1px solid #dedee2;
  font-size: 16px !important;
  font-weight: 700;
  color: #5f5f67;
}

/* 목차 접기 버튼 */
.book-toc .toc-toggle {
  display: flex;
  align-items: center;
  justify-content: center;
  width: 32px;
  height: 32px;
  padding: 0;
  border: 0;
  background: transparent;
  color: #666;
  font-size: 18px;
  line-height: 1;
  cursor: pointer;
}

/* 자동 생성되는 목록 */
#toc_list {
  margin: 12px 0 0 !important;
  padding: 0 !important;
  list-style: none !important;
}

#toc_list li {
  position: relative;
  margin: 0 !important;
  padding: 0 !important;
  list-style: none !important;
}

/* 목차 항목 */
#toc_list li > a {
  position: relative;
  display: block;
  box-sizing: border-box;
  width: 100%;
  padding: 9px 36px 9px 20px;
  color: #92929c;
  font-size: 15px;
  font-weight: 400;
  line-height: 1.5;
  text-decoration: none;
}

/* 오른쪽 화살표 */
#toc_list li > a::after {
  content: "→";
  position: absolute;
  top: 50%;
  right: 2px;
  color: #9999a1;
  font-size: 16px;
  transform: translateY(-50%);
}

/* 마우스를 올렸을 때 */
#toc_list li > a:hover {
  color: #555;
  background-color: rgba(0, 0, 0, 0.025);
}

/* 기본 목록 기호 제거 */
#toc_list li::before,
#toc_list li::marker {
  display: none !important;
  content: none !important;
}

/* 모바일 화면 */
@media screen and (max-width: 767px) {
  .book-toc {
    margin: 24px 0 32px;
    padding: 0 18px 16px;
    border-radius: 7px;
  }

  .book-toc .toc-title {
    min-height: 56px;
    font-size: 15px !important;
  }

  #toc_list li > a {
    padding: 8px 30px 8px 8px;
    font-size: 14px;
  }
}
4. 주의사항
자바스크립트는 일반 본문이나 굵은 글씨를 목차로 가져오지 않습니다.
티스토리 에디터에서 목차에 표시할 문장을 반드시 제목1,2,3 형식 중 하나로 지정해야 합니다.

모든 설정 후에 아래 사진과 같이 목차가 뜨는 것을 확인할 수 있습니다.
감사합니다.
